Thursday, September 30, 2010

Not Worth It?!

This summer my nephew came from the East Coast for a visit. He loves animals, music, science, and most of all, computer programing. He fit it fairly well since those are the same things that we enjoy. Well... maybe not the computer programing as much, but animals, music, and science are on our list!

Vet2Be on the left, AJ leading Janice on the right.
AJ loved the goats. He didn't mind milking and he didn't mind playing with the babies. He spent quite a few hours a day programing on the computer, but he seemed to  genuinely like the animals. We even let him show a few goats at the County Fair.

He drank 1/2 gallon of goat's milk every day.

He told his mom he wanted goats.

He told me his mom said, "They aren't worth it."

I told AJ, "She's right."

Hmmm..... AJ wasn't sure what to think about that for a moment.

Goats cost money, so does their feed and housing, so do vet bills. Goats take time, especially milk goats. You have to be there to milk them, and you have to work with them and treat them like pets if you want them to be easy to milk on the stand.

So.... no, goats aren't worth the money.

But I told AJ that his computer isn't worth it, either. A computer doesn't pay for itself in what it produces. Neither does AJ's cat, Koda.

I asked him how much money Koda brings in. AJ answered, "I don't know. He doesn't share his money with me." Funny kid!

I was trying to tell AJ whatever hobby we choose to enjoy doesn't usually give a monetary return on the investment we put into it. If we pay for violin lessons for our kids, those lessons aren't going to 'bring in the money.' If we have a dog or a cat, they certainly don't give us something in return that would cost less at a store. The reward we receive is much different, and we believe, much greater.

For some reason people think that farm animals have to give back what we put into them. Our family came to the realization that we will never make any money raising goats or horses or sheep or anything else. We do it because we enjoy it, and because Vet2Be wants to be a veterinarian some day. We do it because it teaches him and the other children how to work, how to plan for the future, how to love somebody more than themselves, how to sacrifice something now for something you want in the future.

Around here most of the teenagers are interested in their cell phones, X-boxes, and their clothes. Very few think about next week, let alone next year, or 5 years from now. Most of them can't think outside the box. Most of them can tell you what is on TV tonight, but very few can tell you what the stars look like on a clear summer evening. Most of them have earbuds in and know the latest music, very few can tell you what it sounds like on a moonlit night out in the field. Often they think about the next minute, but they can't think something through. Most can't follow through unloading a dishwasher, let alone caring for an orphaned lamb. Patience and gentleness aren't usually in their vocabulary.

We didn't start farming and raising animals on purpose to teach our kids these things. The kids wanted the animals, and we jumped in for the ride. I am amazed at how much we have all learned about life by raising a few horses, goats, and sheep. I am surprised at the difference between our kids and the kids who attend the local high school. Our kids aren't perfect, not by any means! But they can often solve problems by thinking outside the box, and they can stick to a task, even an unpleasant one, until it is done. They have goals in life and know that the road to the goal isn't always pleasant and it isn't always easy, but it is worth it.

Is having a hobby farm worth it?

You bet! But it sure costs alot of time, money, hard work, heart-ache, and patience!

We consider it 'tuition costs' in the school of life.

Wednesday, September 29, 2010

Goat's Milk Butter

I have been curious about making butter with goat's milk. I've heard it isn't as fast as making butter from cow milk, but I wanted to give it a try.

It was much easier than I thought it would be! Here are photos from my second batch. One of these days I'll get good at taking photos one handed, for now there are still a few fuzzy ones.

It takes a few days for the cream to separate from goat's milk. This milk is about 4 days old. It's hard to see in the photo where the cream is, that's why my finger is there.

At first I tried scooping the cream off the top with a spoon. That didn't work for me. So I tried using a turkey baster! That worked really well. If you use a turkey baster make sure the tip of the baster is right at the top of the cream and don't suck up the cream fast or you will get lots of milk, too.
I put the cream from the top of the milk into a regular quart canning jar and screwed the lid on tight. I shook the jar back and forth--but I didn't shake it hard and fast, I rocked it back and forth gently, but hard enough to get the milk to hit each end.

Make sure that your cream is a little cooler than room temperature before you start shaking it. It turns into butter much more quickly that way. My milk was about 60 F when I started. The temperatures I've read are between 55 F and 66 F.

The first time I tried the butter I gave up after about 20 minutes of shaking. I went out and milked and did some other chores and left the jar on the counter. When I remembered the project sitting on the counter, I checked inside. I was so surprised to see a ball of butter! This time it didn't take nearly as long and I think I'm getting the feel for the change in sound and feel when the cream turns into butter.

I let the butter sit in the buttermilk over night. I didn't have time to wash it and I thought it would be fine to leave it. It was! The next morning I took the butter out of the jar and rinsed it in cold water in the sink. I mushed the butter a little in the water so the milk would separate out of the pockets in the butter.

I rinsed until the water ran clear. It took about 4 times. I learned that I have to be a little gentle with the mushing part, or I end up with more butter on the sides of the measuring cup than I do in a ball.

Final product! Yay! 
I was so surprised! I was really amazed! This tasted like sweet, creamy unsalted butter! It didn't taste goaty flavored, either! It tasted different from the butter we buy at the store, but I think that's because it was so fresh.

The butter is very white. I read that is because goats are more efficient with their use of food and all the carotene has been converted into Vitamin A. A cow isn't as efficient so some of the carotene finds it's way into the cream which is why cow milk is yellow.

I used the milk that I had skimmed the cream from to make some mozzarella. It worked just fine and it doesn't seem any drier than the full fat mozzarella! I'll use the milk leftover from making the butter in bread, just to see how it turns out. I might try to turn the leftover milk from the butter making into buttermilk by adding some cultured buttermilk to it. I wonder if someone let the leftover milk sit out and 'ripen' like making clabbered milk? Hmmm..... more experiments to try!

I probably won't make alot of butter this way. But I probably will make butter this way for special occasions like Thanksgiving and Christmas and parties without little kids.

Tuesday, September 28, 2010

Udder Results

The veterinarian emailed with the results of the biopsy test.

The results are in and they show a severe chronic response that is suggestive of a topical irritant. The inflammation in the skin layers is very superficial and not typically treated with steroids. So I would rather not give steroids at this time. If she is still doing well and has still shown response to Exenel, then I wouldn't do any other medications right now.
The cause of this was probably a skin reaction to something that was applied to the udder. It was probably something normal that this animal had an abnormal reaction to. I would apply nothing to the udder for the time being. And then we can talk before you want to start milking again.
Let me know if she is still doing well or if you have any other questions.
Our vet is doing some Army training (he's a U.S. Army Veterinarian, too) and he was kind enough to take a few minutes to email. What a great vet!

We haven't stopped milking her. We were giving her milk to the chickens. But now we know there is nothing wrong with the milk, so we are back to using it again!

At this point more of the scabs are healing, turning a light brownish color, and some are falling off. I'm not sure how long it will take for them all to heal, but we are all so happy that there is nothing major wrong with the doe. It will probably just take time to heal.

So this poor girl has endured a 15 month long allergic reaction. No wonder nothing we used helped! She is such a sweet, mild tempered, and patient doe!

Monday, September 27, 2010

Sparky's Tail

We didn't dock Sparky's tail in the spring. She was a bit late as a lamb, and then the summer got away from us. Our friend, Sheepy, said she has docked tails on sheep that were as old as three years. Sheep are generally healthier, have an easier time breeding, and have an easier time lambing when their tail is docked.

We waited until fly season was over before docking her tail. Poor thing! If it wasn't best for them, we probably wouldn't do it.

I trimmed a little near the caudil fold of her tail. That's where her fleece is white.
Before banding, Sparky got a tetnus antitoxin shot just to be on the safe side. I also soaked the band in iodine for just a moment before I placed it on her tail. Vet2Be held her while I banded.
Sparky loves Vet2Be and is hiding between his legs even though he was the one that held her while I did the nasty part.

Sparky in front and Mandy in back. The two lambs that Vet2Be bottle-fed this spring.

Just in case you are wondering if Sparky got flighty after banding her tail. She didn't. She still comes running when Vet2Be calls her. Every evening she asks to come in the barn and get a petting from Vet2Be, sometimes she even gets a treat!

Sunday, September 26, 2010

StoveTec

We bought a StoveTec stove last year when we heard about a group order through a local homeschool group. We thought they were such a great idea to have in an emergency that we bought four. One for us, and three to give as gifts to our married daughters and a close friend.

Our church is doing a group buy and will be showing them to members so they can see what they look like. Since I had never opened my box, I decided to open ours and give it a try by making dinner.

I thought that blogging about it might be helpful for them, and for other friends that are thinking about getting a StoveTec Rocket Stove for emergencies.

It was surprisingly easy to use! Here's what I did for dinner.

Here is the stove set up on our metal patio table. If you look closely you can see one sheet of newspaper crumpled up inside. 
View from the top, down. One sheet of newspaper and a few twigs on top.
The pot to the side has an aluminum skirt around it. That comes with the stove so that the heat from the stove is funneled up around the outside of the pot. More heat goes into cooking and less heat is wasted. The two larger sticks on the table are all it took to cook our dinner.

Vet2Be gets to light the fire, of course! Every Boy Scout I know loves lighting a fire!

We found that we had to blow on the fire to get it going. Both doors (the larger door with the burned paper and the smaller door beneath) are both open to provide better airflow. If you have ever used a 'burn barrel' you understand that this stove is really just a little chimney. 
Five minutes after putting the paper and twigs into the stove, the larger sticks are burning. (We checked the times on the photo to see how long everything took).

What's for dinner? Sausage and potato skillet dinner. An easy one dish meal that was perfect for our first time. The yellow, curved thing to the right of the pot is one of the bricks from the stove. It fits behind the larger door when you are burning charcoal instead of wood.
Seven minutes after putting the newspaper and twigs in, the fire is ready to cook on. Notice how much wood is sticking out of the stove at the bottom. Watch in the next few pictures to see how it burns. This is the last of the smoke we saw from the fire. The fire was hot enough and the fuel burned efficiently enough that there wasn't any more smoke.
At this point (about 11 minutes into starting the project) the outside of the stove is still cool to the touch. It does get warm by the time we are done cooking, but it didn't get hot enough to blister skin while we used it. Of course, we would always keep kids away from it, and I wouldn't encourage anyone to put their hand on the side of the stove unless it was me--just to check.

I put the lid on to keep more of the heat in the pot. I used a cast iron dutch oven without legs. I knew that there would be carbon from the fire on the outside of the pot and I didn't want to try to get that off my nicer pots later.
Twenty minutes after putting the newspaper into the stove the sausage is cooked and the potatoes, onions, and peppers are ready to add. So far it has only taken about five minutes longer than doing it on the stove. That's because we had to light the fire and wait for it to get hot enough to cook. 
Fifty minutes from the time we put the newspaper and kindling in, dinner was ready. In the pot is 2 pounds of sausage, 5 medium potatoes, 1/2 large onion, 1 green pepper, 1 red pepper, and 1 cup of water. It was a good size meal for the three of us and there were two servings left for the freezer.

I moved the fuel holder (the wire rack) away from the stove and slid the extra brick in place. I closed the bottom door completely and left the dinner on top. Dinner stayed hot for an hour. The stove was still warm 3 hours later.
Both doors closed. The pot skirt is still on the pot and dinner is still sitting on top of the stove. I should have taken a photo of how much fuel was left. Not much, but I cooked for an hour with just the two sticks you saw in the other photos. There is a little left in the stove and it would probably be enough to help start another fire.
This little stove is fairly heavy for its size, but it does a great job of 'one pot' cooking. It would probably do very well with a fry pan, too. I imagine that if you were camping it would be a great camp stove especially if you are in an area with fuel. I like the handles on the side that make it easy to transport and pack away. I wouldn't want to carry this on a backpacking trip or for a long distance.

If there is an emergency that includes a lack of fuel, this is a great little stove to have.

We will probably store ours in the camper. It there is an emergency, our plan is to hook up the camper and get out fast. The camper is a good shelter and has enough in it to help us make it through a disaster for a few weeks, even in the winter.

Saturday, September 25, 2010

It Was The Chair!

I've been dealing with pinched nerves in my lower back for months now. I hurts so much! I can hardly sit for very long and sometimes it is hard to stand. Walking around and laying flat on my back are the two things that seem to relieve the pain. Milking seemed to make it worse, so I adjusted how I milk the girls.

In the spring I had a really bad day after teaching guitar. I really had to walk around and not sit down for more than an hour before the pain settled down a bit. I covered a gel chair pad with some pretty fabric and put that on the chair I teach on. It seemed to help a little bit, at least reducing the pain to bearable.

Gel chair pad before covering.

Gel chair pad after covering. This is what I sit on while I teach guitar. It also helps that I teach for a few hours every afternoon instead of two long days of 5 hours each (10 students each day).
Under the pad is a piece of non-slip shelf pad so that the chair pad stays in place.

The other day, after visiting the chiropractor again, I was trying hard to pay attention to exactly what was causing the most pain.

It was the chairs I sit in! Duh!

My old computer chair. Since my desk is in the great room (kitchen, sitting area, computer area, dinning table), I like using something that looks a little more like house furniture instead of office furniture. Big mistake!
I remember seeing an exercise ball chair with wheels on the internet a few months ago. I wasn't searching for that at the time, but apparently it stuck in my mind.

Hubby has one of those big exercise balls. He didn't like it as much as he thought he would, so it sat in the storage room for a year.

Hmmmm..... I wanted to see if that would help my back. I pulled it out of the storage room, plopped it in front of my computer and, Voila! Instant back relief! I couldn't believe it.

It was a bit low, so I looked on the internet for the chairs just to see how much they would cost.

I'm a cheapskate, so I really didn't want to spend the money on that if I could figure out something using something I've already got.

"Use it up, wear it out, make it do, or do without."
That's what we are taught in order to stretch our resources. I didn't think I could do without something to relieve the pain, but maybe I could find something in the house to 'make do' and raise the height of the ball as well as keep it from rolling around the room when it isn't in use.

I have some wonderful oval plastic buckets that we use for everything from storing kindling in the winter to carrying stuff for camping to storing extra yarn. This is one that had yarn in it.
So far, so good! The bucket raises the ball so that my elbows are even with my desktop, and it keeps the ball from rolling around on the floor when I'm not blogging or doing music on the computer.

Ahhhh..... relief!


It took my hips a few days to get used to the ball. The muscles were a bit sore, but it wasn't the pinched nerve type pain that I was enduring before. And I can wiggle my behind while I'm sitting, which seems to help, too.

I'm not sure if I will be able to use the ball chair to teach guitar from, but you can be sure I will carry it to my sewing room when I am quilting and using the knitting machine this winter. 

Friday, September 24, 2010

Someone Needs a Babysitter

This is Carson. His best friend is Rosco. Rosco had to leave for a little while on Tuesday for training. Carson is a bit lonely so his owner asked if he could come over and play with the goats today.

So, Carson is here for a few hours so that he doesn't run himself ragged with worry!

Carson isn't locked into the run. He's having a snack with Scorpio who is inside the stall.
Carson is a really beautiful horse that does well in the Hunter-Jumper shows around here. Last year his owner was the top rider on the circuit! He was bred and born next door. It has been wonderful to watch Carson grow up and become such a wonderful horse!

We're anxiously waiting for Rosco to turn out as well as Carson. I'm sure he will. His owners are wonderful, caring horse owners.

Thursday, September 23, 2010

Udder Update

Ginger seems to be doing better. It doesn't show very well in the photo because she still has scabs on her udder. But the redness is gone and the scabs are different. I'm assuming that is because the infection is gone, but whatever is causing the allergic reaction isn't. The scabs look as if they are healing at this point, but I'm not going to do the 'Happy Dance' until they are all gone. Maybe I'll do a little 'Happy Dance' if half of them heal and fall off!

After two injections of Exenel (two days worth) she had flakes of skin that peeled off her udder. I'm assuming that was dead skin, perhaps the most irritated skin, that had died and fallen off.

She is still milking 5-6 lbs twice a day. We don't want to dry her off unless the vet asks us to. She's our experimental doe. She kidded out in March 09, so she has been milking continuously for 18 months. We would like to see how long she will milk before she needs to be bred again.

The vet called yesterday. He hasn't gotten the results back yet. He'll call as soon as he gets the results and has a chance to look them over. He's on the other side of the country attending some specialized Army training. He's an Army Veterinarian, too.

The darkest scab near her leg is where one of the samples was taken from. There are a few stitches there that will be removed after 14 days. The other scabs seem to be healing, but I've gotten excited a few times about stuff looking as if it was going to work, so I'm a little hesitant still.

Wednesday, September 22, 2010

Hail Storm!

We haven't had a hail storm in a few years! This one lasted about 10 minutes. There was one about an hour earlier, too. We don't usually have to much 'weather' around here. It is usually sunny and bright. Today there were morning thunderstorms and hail!

We need the water, so I'm very grateful for it. It didn't seem to damage the grapes or the raspberries. That's good. And all our animals have shelter, so they were out of the storm, too.

Hail bouncing off the roof by the back door.

The water is pouring off the roof and out into the grass. The garage flooded as well. It's normal for the garage to flood... it's below the level of the back yard. Whoever decided that was a good idea wasn't thinking clearly at the time!
Poor maple tree! The leaves were just starting to turn. There weren't any leaves on the ground before the storm started.

More hail bouncing off the roof! It was a wonderful storm!

View out the front door to the street. Yay! Water!

The storm didn't last long. It never does out here. If we ever get two days of rain or storm in a row, our family is thrilled! When we get thunder and lightening, like we did today, we just giggle and smile!

Feta Change

If you've seen my previous posts about making feta, you'll remember that my curd forms very quickly after I add the rennet, and the curd doesn't turn into a solid creamy curd.

I thought about that and came up with the idea that my milk might be a little too acidic.

I decided to try adding half as much starter (I use yogurt) but keep everything else the same. Instead of adding 1 cup (8 ounces) of yogurt, I added 1/2 cup (4 ounces). The yogurt used to start this batch of feta and the last batch of feta was from the same batch of yogurt. Both times I made the feta I used raw milk, not pasteurized milk.

Can you tell I'm married to a scientist? "Only change one variable at a time and check the results!"

Here's what my curd turned out like this time:
This time the curd turned out solid and creamy colored.
It cut beautifully, too.
This batch was milder in taste, too. It's delicious, like it always is, just not quite as strong.

Tuesday, September 21, 2010

Winner of the "Ugliest Udder" Contest!

Well, not really. There isn't really any contest called the "Ugliest Udder" Contest.

But this gal would win if there was!

Her name is Gidget. She is a sweet goat. This is the fourth year she is here being bred to our buck. Surprisingly, she throws beautiful kids when bred to our buck! None of them have udders that look like this. They all have very good or excellent udders with good attachments. All of Gidget's grandkids that her owner has kept track of have had twins on the first birth. Gidget usually has triplet doelings, but last year she had 2 doelings and one buckling.

This sweet doe has a really bad side udder attachment. Her front and back attachment aren't great, either. Her udder looks like a bag that is just barely holding on! 
After milking. Looks worse, poor thing!
To be fair to the gentle girl, this is a photo of her standing differently so her empty udder looks a little better.
This is the other reason her owners keep her! She milks out 7lbs - 8 lbs every night! When she is milking during the summer, she gives 7lbs - 8lbs every milking for a total of 14+ lbs per day.
Gidget will never win any prizes at a goat show. But if her owners had the money to put her on milk test, she would probably get a good * rating with ADGA (she is a registered American Saanen). She is also a good girl on the milk stand. You can imagine that giving all this milk, she is also a grain vacuum.

Just a little history. Last year at this time she was only milking about 1 lb, sometimes 1.5 lbs. She was really copper deficient! This spring her owners gave her a liquid copper supplement that Hubby mixed up for our Saanens and she had more milk all summer.

We are lucky to have her most of the winter and enjoy all the milk. More milk means more cheese!

Updated Solait Booklet

I forgot to scan page 2 of the Feta recipe in the Solait Cheesemaking Booklet! Sheesh!

Thanks for being my editor, Apricot!

Here's the updated booklet with all the pages.
Solait Cheese Making                                                                                                                           

Here's a related cheesemaking booklet from Scribd. There are some good recipes as well as some sites to visit.
E-216

Monday, September 20, 2010

Freecycle Rhubarb

On Saturday I got a call from someone on Freecycle (www.freecycle.org). They had rhubarb in their yard that they didn't want to harvest. (If you haven't heard about Freecycle, it is a network made up of almost 5,000 groups in different areas in the US. If you have something you don't want you post it on Freecycle, and someone in your area who does want it will respond, come by, and pick it up.)

Son1 not only loves raspberry-rhubarb pie, he loves to make it!

I grabbed Vet2Be and his best friend, Taco, and headed over to the next town to harvest the rhubarb.

We ended up with 4 buckets full of stalks and leaves. I sent two buckets with Taco because his mom, Sheepy, preserves pretty much anything, but she hadn't ever done rhubarb. She's always up to trying something new, too. She's one of those down-to-earth, great friends that I have learned so much from.

The rhubarb wasn't quite ripe according to the pictures I found on the internet. But the house was about 20 minutes away from where we live so I decided to harvest it anyway and see what happens when we do the cooking later on.

Here's what I found on the internet about harvesting rhubarb. Harvest late spring through the end of summer. Take a stem near the base, twist and pull gently until it separates from the plant. We used a knife to cut ours, but the source on the internet says that gently twisting and pulling will invigorate the roots. (Wikihow)

My two buckets of rhubarb. It took Vet2Be, Taco, and I about 10 minutes to cut 4 buckets full of rhubarb.
Leaves trimmed, stalks washed, sitting in my farm sink. Rhubarb leaves contain oxalic acid and are poisonous, throw them in the garbage. 
Cut into 1" pieces.
Packaged and sealed. I put about 3 cups of cut rhubarb into each bag. Then labeled them and tossed them in the freezer. Son1's recipe calls for 2 cups of rhubarb in a pie. I was able to put 11 packages of rhubarb in the freezer.
I haven't preserved as much food as Sheepy has, but I've done some over the years. This was the fastest, easiest preserving I have ever done. I think it took me about 2 hours total, and that included driving 20 minutes away to get the rhubarb.

If you have a really old recipe book, you will notice that there are recipes that call for 'pie-plant'. That's the old name for rhubarb.

Here is Son1's recipe for Raspberry-Rhubarb Pie. Sometimes he uses frozen mixed berries instead of raspberries.

Crust
This is Grandma T's Best Pie Crust recipe. I've been using it for years. Amounts in parenthesis are for a bigger batch of dough. I'd much rather have a little extra than not enough, so I usually use the larger recipe

  • 2 1/2 cups flour (3 1/4 cups)
  • 1/2 teasp salt (3/4 teasp)
  • 1 cup shortening or lard (1 1/2 cup)
  • 1 beaten egg (1 beaten egg)
  • 1/4 cup liquid--milk or water (1/4 cup + 2 Tablespoons)
  • 1 Tablespoon vinegar (1 1/2 Tablespoons vinegar)
  • 1/4 cup sugar - optional (1/3 cup sugar)

Directions

  1. Mix flour, salt, and shortening with a pastry blender until crumbly.
  2. Mix liquids well in another bowl.
  3. Make a well in the flour mixture and add liquid.
  4. Mix until dough is moist.
  5. Divide dough into two balls (one for the bottom and one for the top).


Filling

  • 3 cups rhubarb cut into 1" pieces
  • 3 cups raspberries (frozen or fresh)
  • 1 1/3 cup sugar
  • 1/4 cup cornstarch
  • 1 tablespoon butter

Directions

  1. Mix sugar and cornstarch in a large bowl until combined.
  2. Add rhubarb and mix well. Let it sit for about 10 minutes.
  3. Mix in the raspberries (or mixed berries).

Pour the filling into a 9" prepared pie crust, dot with butter. Cover with the top crust.

Bake at 450˚F for 15 minutes. Then reduce the heat to 325˚F for 30 more minutes or until the pie is golden brown. It will often take longer if the fruit is frozen when put into the pie shell.

I found out last night that I have a neighbor who has lots of rhubarb and would love to share, so next week I'll be harvesting some more! Yay!

And he said that if I wanted a plant he would be happy to divide one and let me plant it in my yard. Sweet! Well.... sour really. Either way, Son1 will be excited to have more rhubarb in the freezer and a rhubarb plant in our own garden!

If you have a recipe for raspberry-rhubarb jam, send it along, I'd love to try it. The other rhubarb recipe I have heard is yummy is rhubarb-applesauce!

Sunday, September 19, 2010

Not Dead Yet!

I was honored last week by being part of an interview for New England Cheesemaking Supply Blog's September 15th entry. I love their blog and have often found so many helpful hints and ideas as well as cheesemaking inspiration. It is one of the blogs that I regularly visit!

One of the questions that Jeri asked me is one I get asked quite often, "How do I find the time to make cheese?" or "How do I find time to ______ (fill in the blank)?" I don't really see myself doing as much as many people think, but I do believe that "I'm not dead, yet!" and "The journey of a thousand miles begins with a single step"

What does that have to do with my life? Well.... If I want to learn something new, then I start. I don't sit around and just wish I could do it. I try to spend my time the same way I would spend money, carefully.

Some people assume that I grew up on a farm with animals, enjoying knitting, spinning, reading, and playing music in my spare time. They imagine me canning and preserving food in the late summer, and pressing cider in the fall, quilting and sewing in the winter, and snuggling up next to the fire with a good book in the evenings, all the while enjoying a loving family spirit. Quite an old-fashioned life!

I didn't. Far from it. I come from a twice-broken home that has been touched by many hardships from suicide and drug abuse, to alcoholism and neglect, from AIDS to poverty. Pretty much normal for many families during the last 40 or 50 years.

When I got married 30 years ago about the only thing I could do was make peanut butter and jelly sandwiches and do laundry. That's it. I was going to school, and so was Hubby.

I got pregnant within 4 months (woops!) We decided before we married that I would stay home and raise the kids. If we had 'em.... then we weren't going to send them to daycare. We also knew that Hubby would graduate with his Ph.D. in Chemistry. Those were two goals we were not going to deviate from them no matter what! I look back now and think we were absolutely crazy! But we did it anyway!

That meant with Hubby going to school and me at home with the baby instead of working outside the home. I had to figure out how to save money. I learned how to bake bread, cook potatoes a million different ways, sew clothing, and generally do things in as inexpensive way as possible. In the 10 years it took Hubby to graduate and do his Post Doctoral Fellowship, I learned alot! We only took out one student loan and never were on government assistance like many of our peers were.

I had gotten used to 'just doing it' because I had to, then I realized I enjoyed trying new things and learning new skills. I also learned how to deal with 'unwanted results'. Some people would call those 'failures', but I like what Edison is supposed to have said about making a better light bulb:

"I have not failed 700 times. I have not failed once. I have succeeded in proving that those 700 ways will not work. When I have eliminated the ways that will not work, I will find the way that will work." -Edison

He also said: "Opportunity is missed by most people because it comes dressed in overalls and looks like work." and "Genius is one percent inspiration, ninety-nine percent perspiration."

When I set about to learn something new, whether it was sewing, knitting, crocheting, cooking, baking, preserving food, cleaning, raising children, playing guitar and banjo, song-writting, blogging, pottery, quilting, soapmaking, cheesemaking, I realized that I would learn how to NOT do something quite a few more times than I would learn how TO do something. Hubby is a scientist, so he has the same attitude. We both put our shoulder to the wheel and get to work.

And since I'm not dead yet, and I don't sit around waiting for life to happen to me. We tried to raise our children with the idea that being able to read was 'magic'! If they could read, they could learn anything! And it's true. I've learned so many skills by reading first, trial and effort next. Hubby has even learned how to build violins through books!

I'm also a religious person, so there are a few scriptures that come to mind as well. Mathew 17:20 says, "If ye have faith as a grain of mustard seed, ye shall say unto this mountain, Remove hence to yonder place; and it shall remove; and nothing shall be impossible unto you." Mark 9:32 says, "...If thou canst believe, all things are possible to him that believeth."

I figure, if faith as small as a mustard seed will move a mountain, and all things are possible if I believe, learning a new skill is probably easier than moving a mountain..... so of course I can learn something new. I just have to take the first step by opening a book, asking someone that already knows how to do it, taking a class, or experimenting on my own.

One last thought. We do what interests us, in other words, our hobbies take up our free time. If your hobby is the latest TV show or playing the latest online game, great! I don't spend much time watching TV (except for watching some Great Courses or Christmas movies while cleaning the kitchen) because I would rather be doing something else. I've weeded most of the unwanted time-eaters out of my life and spend my time on things that bring me enjoyment. Life is about choices, choices in attitude, choices in how we spend our time, and in how we view our life.

So, get your overalls on and do something new! After all, you aren't dead yet, either!

And leave a comment. Let me know what you do in your spare time! I'd love to read about it!

Saturday, September 18, 2010

Making Feta

I made feta about two weeks ago. I took the photos but haven't had time to sit down and write about it for my good friend, Sheepy.

I use the recipe in Home Cheesemaking by Ricki Carroll as my basic recipe, but I changed the starter from a mesophilic starter to yogurt. The reason I use yogurt is because it works as well as the plain mesophilic starter and has a little different flavor. I read about using yogurt in an old Solait Cheesemaking booklet.

Feta takes me about 7 hours to make. Most of that time I am not doing anything with the milk or curd itself, it is sitting and waiting for the next step as I follow the recipe. I start this cheese in the mid-morning and it is ready to put in the fridge by dinner or after we are done milking.

Feta
Step 1 (From Home Cheesemaking--with modifications)
Heating the milk and adding the starter

I usually make a two gallon batch since I have so much milk. In the photo below I've heated two gallons of milk to 86˚F.

Two gallons of fresh goat's milk. I didn't pasteurize it this time. After making clabbered milk I realized that raw milk isn't as scary as I once thought.


86˚F, just the right temperature to add the starter.
I added 8 ounces of home made yogurt instead of the mesophilic starter. I think next time I will try it with 4 ounces, just to see what happens. I've had good results adding half the starter to my yogurt and chevre recipes, too.

Then the milk is covered and left at room temperature for an hour to ripen. I put it on the back of my stove in a draft free spot. In the winter I put it into my wonderbox, but in the summer I leave it on the stove.

Ripening for an hour on the back of the stove. Sometimes it ripens for a little longer if I am off doing something else.


Step 2 
Adding the rennet.

1 teaspoon of liquid rennet added to 1/3 cup of unchlorinated water.

Stirring in the rennet with an up and down motion using my skimmer spoon. I'm ordering a slotted spoon from New England Cheesemaking Supply this month, but this has worked well for most of my cheeses.
The recipe says to stir the curd for 'several minutes'. It starts to form a curd within about 80 seconds the last three times I've used the recipe. It doesn't seem to affect the final product, but it is still curious for me. The next time I try making feta I'm going to try stirring for one minute instead of the two I normally do.

Odd looking stuff! I don't seem to get a creamy, solid curd in the whey lately. This is what it looks like as the curd is setting for another hour. I've been wondering if my milk gets too acidic while the starter is ripening.

Step 3
Cutting the Curds
Cutting the curds with my large spatula/knife. It doesn't have a sharp edge, it is just a long, thin blade. Sometimes the curd swims around the pot while I am trying to cut it. If that happens, I put my clean hand in and gently hold the curd while I am cutting with the other hand.
You can see, I don't get a nice curd! That's okay with me right now, it still tastes good in the end!

After cutting the curd, I let it rest for 10 minutes. Apparently cutting the curd is hard work for the cheese.

Step 4 
Stirring the curd

Gently stirring for 20 minutes. The book doesn't mention keeping it at the same temperature. I turn the heat on very low, the lowest setting possible, and stir for 20 minutes. I check the thermometer often and try to keep it right around 86˚F


(look here for updated recipe changes)


Step 5
Draining the curd
Pour the curds and whey from the pot into a wire mesh strainer lined with butter muslin. My mesh strainer fits exactly into the top of my spaghetti pot, that I only use for cheesemaking!

Corners all tied up and the curds draining on the cider press next to my computer. See the whey coming from the bottom in a steady stream? Yum! This smells really good! It will hang here for about 4 hours.
What the leftover whey looks like. I use it to make bread or pour on the garden. My neighbor likes to use it for her bread, too. Nice to know it goes to good use and I don't have to dump it down the drain.

Step 6
Crumbling the curds

Right after I open the bag!
Ahhh... the beauty of a nicely drained curd! It is so smooth and creamy looking, I love it!  This is one of the reasons I fell in love with cheesemaking, the curd as it comes out of the bag.
Instead of cutting the curd into 1" cubes, I crumbled this batch. We love it crumbled on salads. Vet2Be and I love to eat the cubed version for a snack.  We make it both ways depending on what we don't have in the fridge.
I've sprinkled on 2 tablespoons of non-iodized salt. The recipe says to use 2-4 tablespoons per gallon of milk, but that is too salty for us. I always start out with less salt and add more to taste.

Step 6a
Quick aging the cheese

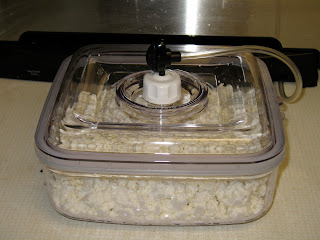
Since I have a FoodSaver with a marinating container, I thought I would see if I could quick age the cheese this time. I put the curds into the container and hooked it up to the FoodSaver. If I was being scientific (in other words, I should have.....) I would have put half of the salted curds in a covered bowl in the refrigerator and half the curds into the marinating container. We're still milking, so I'm sure I'll give that a try the next time!


The crumbled, salted curds in the marinating container. All I have to do is push the 'Marinate' button and the machine cycles through suction and no suction for about 10 minutes. I pushed the button twice for a total of 20 minutes.

All ready to go into the fridge. Masking tape makes a great label in my fridge. I always know what is in the container and what the recommended 'ready' date is

Of course I tasted it before I put it in the fridge. Most of it was gone before the 'ready' date, too! It was delicious!